 Save
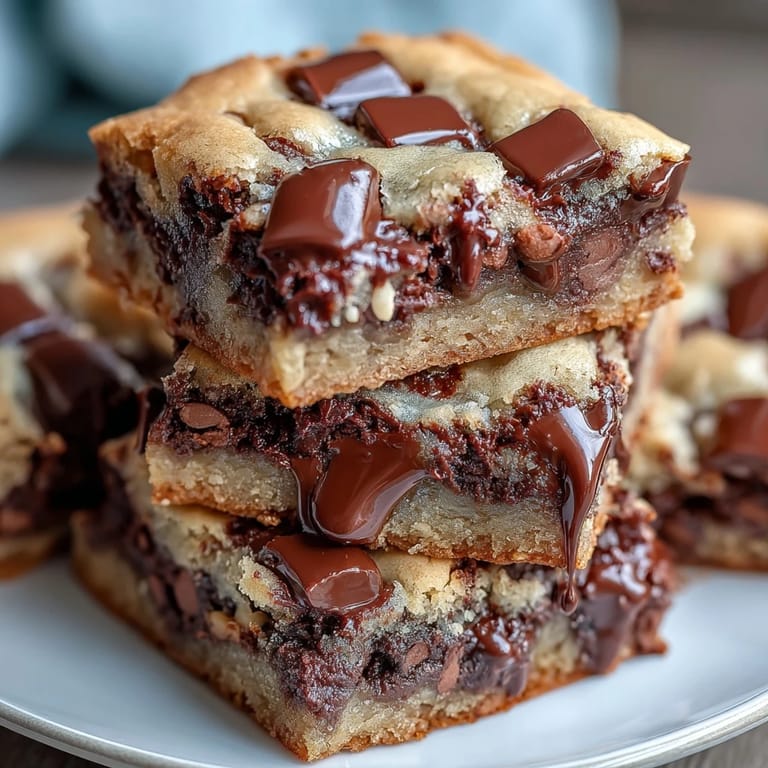
Save My cousin called me three weeks before her graduation asking if I could bring something special to the party, something that screamed celebration without requiring me to pipe frosting for hours. These cookie bars landed in my mind fully formed—chewy, loaded with chocolate, and customizable enough to match her school colors with just a handful of colorful candies. I baked my first batch on a lazy Tuesday afternoon, and by the time they cooled, I realized I'd accidentally created the perfect crowd-pleaser that tastes like accomplishment in every bite.
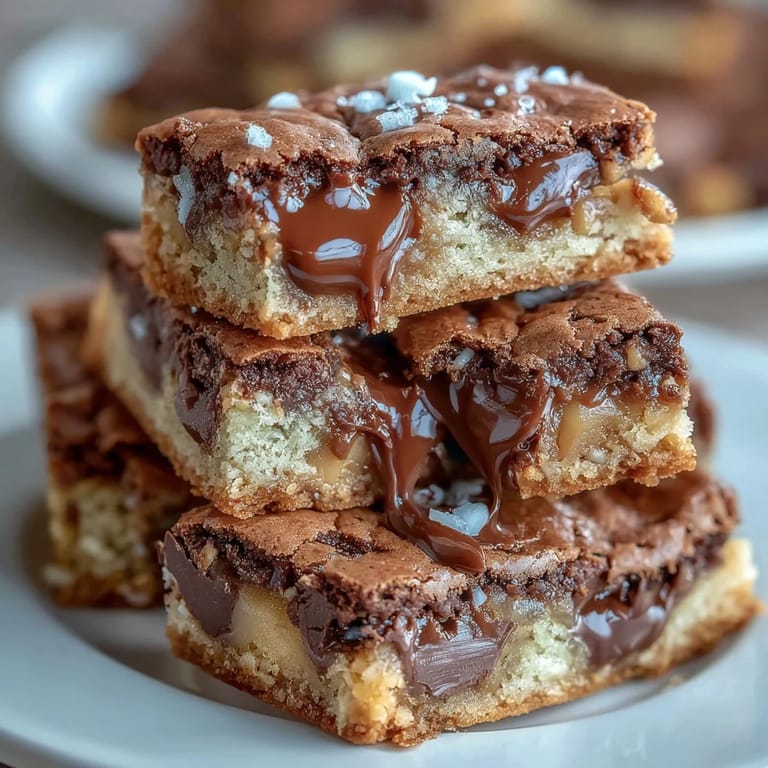
I showed up to that graduation party with these bars still slightly warm, and watched my cousin's face light up when she saw the white chocolate drizzle catching the kitchen light. Her friends didn't leave a single piece behind, and three people asked for the recipe before I'd even finished my first bar. That moment when food becomes part of someone's memory of their big day—that's what cooking is really about.
Ingredients
- All-purpose flour (2 1/4 cups): This is your structure, so don't skip the proper measurement—too much flour makes them dense, too little and they'll spread like puddles.
- Baking soda (1 tsp): The secret to that perfect chewy-yet-set texture; it neutralizes the brown sugar and makes the edges crispy while keeping the center soft.
- Salt (1/2 tsp): This tiny amount wakes up all the flavors and prevents the bars from tasting one-dimensional and overly sweet.
- Unsalted butter (1 cup, melted and slightly cooled): Melting it first creates a richer, more cohesive dough, and cooling it slightly prevents the eggs from scrambling when you add them.
- Light brown sugar (1 cup packed) and granulated sugar (1/2 cup): The combination of both sugars gives you moisture and chewiness from the brown sugar plus structure and slight crispness from the granulated—it's a partnership.
- Eggs (2 large): These bind everything together and add richness; bring them to room temperature for better mixing, though honestly I've skipped this step a hundred times with no disasters.
- Pure vanilla extract (2 tsp): Use real vanilla, not the imitation stuff, because this recipe doesn't have a ton of competing flavors and the vanilla should shine.
- Semi-sweet chocolate chips (1 cup): The backbone of flavor; I've used slightly melted chips when I wanted them more integrated, and kept them whole when I wanted visible pockets of chocolate.
- Colored candy-coated chocolates (1/2 cup): This is your celebration moment—pick whatever colors match the occasion and don't worry about perfectly distributing them; their charm is in the scattered, festive look.
- White chocolate (4 oz, chopped or chips): Quality matters here since white chocolate is finicky; get real white chocolate if you can, not white chocolate coating, because the difference is noticeable.
- Vegetable oil (1 tsp for melting): This prevents the white chocolate from seizing and keeps the drizzle smooth and pourable instead of thick and gloppy.
Tired of Takeout? 🥡
Get 10 meals you can make faster than delivery arrives. Seriously.
One email. No spam. Unsubscribe anytime.
Instructions
- Set up your stage:
- Preheat to 350°F and line your 9x13 pan with parchment paper, leaving enough overhang that you can grab it later and lift the entire slab out in one satisfying motion. This step saves you from awkward bar extraction and crumbling edges.
- Mix the dry team:
- Whisk flour, baking soda, and salt together in a medium bowl—this distributes the leavening evenly so you don't end up with dense patches. Set it aside and don't touch it until you need it.
- Build your wet base:
- In a large bowl, whisk the slightly cooled melted butter with both sugars until you get a smooth, glossy mixture that feels more like wet sand than dry ingredients. Add the eggs one at a time, whisking each in completely, then add the vanilla and keep whisking until everything is pale and slightly fluffy.
- Fold gently:
- Add your dry ingredients to the wet mixture using a spatula or wooden spoon, folding until you see no white streaks of flour—but stop there. Overmixing develops gluten and makes bars tough, so embrace the lumpy stage.
- Load it up:
- Stir in your chocolate chips and colored candies, distributing them as evenly as you can manage; some clumping is fine and actually adds to the visual appeal.
- Spread and bake:
- Pour the dough into your prepared pan and use an offset spatula or the back of a spoon to spread it evenly into the corners. Bake for 23 to 25 minutes—the edges should be lightly golden but the center should still feel slightly soft when you touch it gently.
- Cool completely:
- Let the bars cool all the way in the pan on a wire rack; rushing this step means your drizzle will melt into puddles instead of setting into elegant lines. This is the hardest part because they smell incredible, but patience pays off.
- Melt and drizzle:
- In a microwave-safe bowl, melt your white chocolate with the vegetable oil in 20-second increments, stirring between each burst to prevent overheating and seizing. Once smooth, pour it into a small piping bag or just use a spoon to drizzle artistic lines across the cooled bars.
- Final flourish:
- Sprinkle any additional colored sprinkles over the wet white chocolate if you're feeling celebratory, then let everything set at room temperature for at least 30 minutes before cutting into 16 pieces.
 Save
Save There's something about making food for a celebration that changes how you work in the kitchen—you move slower, you taste as you go, you think about who's going to eat this and smile. These bars became that for me, a way to say congratulations without saying much at all, just handing someone a piece of their achievement wrapped in chocolate and color.
Customizing for School Colors
The real fun of these bars is treating them like an edible canvas for whatever colors matter to someone. I've made batches with royal blue and gold M&Ms for a friend's alma mater, and hot pink and silver for a girl's night celebration, and each version felt brand new even though the base recipe stayed exactly the same. You can even tint the white chocolate drizzle with food coloring if you want to go full coordinated, though I've found the colored candies do enough visual heavy lifting on their own.
Storage and Make-Ahead Magic
These bars actually taste better on day two or three, after the flavors have settled and the texture has firmed up slightly, so don't stress about making them the morning of an event. Stack them in an airtight container at room temperature for up to four days, or freeze them before the white chocolate drizzle if you're planning ahead; the dough portion freezes beautifully for up to two months and you can bake fresh and drizzle right before serving.
When Things Go Wrong (and How I Fixed Them)
I've made these bars in different kitchens with different ovens, and learned that every oven has its own personality. The first time I made them in my mom's kitchen, they baked faster and came out darker, so I started checking at 20 minutes instead of the full 25. If your bars look too pale at 23 minutes, give them another 2 to 3 minutes and don't worry—a little extra color adds depth. If the white chocolate drizzle hardens before you finish, just microwave it for 5 more seconds and keep going; it's more forgiving than you think.
- If the dough seems too wet, it's probably because you packed your brown sugar too loosely—this is fixable by refrigerating the dough for 15 minutes before spreading.
- If your bars spread too thin and cook too fast, your butter was too warm when you mixed it; next time, let it cool for a full minute longer.
- If you accidentally overmix and the bars turn out dense, they're still absolutely edible and honestly kind of fudgy, which some people prefer anyway.
 Save
Save These bars are proof that celebration food doesn't have to be complicated to feel special. They're the kind of recipe you'll make again and again, each time adding your own small touches until they become your signature send-off for every milestone worth marking.
Recipe FAQs
- → How do I ensure the bars stay chewy?
Use melted butter and avoid overmixing the batter to maintain a soft, chewy texture in the bars.
- → Can I customize the candy colors?
Yes, use candy-coated chocolates in colors that suit your occasion, such as school colors or holiday themes.
- → How should I melt the white chocolate for drizzling?
Melt white chocolate slowly with a teaspoon of vegetable oil in short microwave bursts, stirring frequently for smooth consistency.
- → What is the ideal baking time for these bars?
Bake for 23-25 minutes until the edges are lightly golden and a toothpick inserted near the center comes out mostly clean.
- → How can I store the bars to maintain freshness?
Store bars in an airtight container at room temperature for up to four days to keep them fresh and soft.