 Save
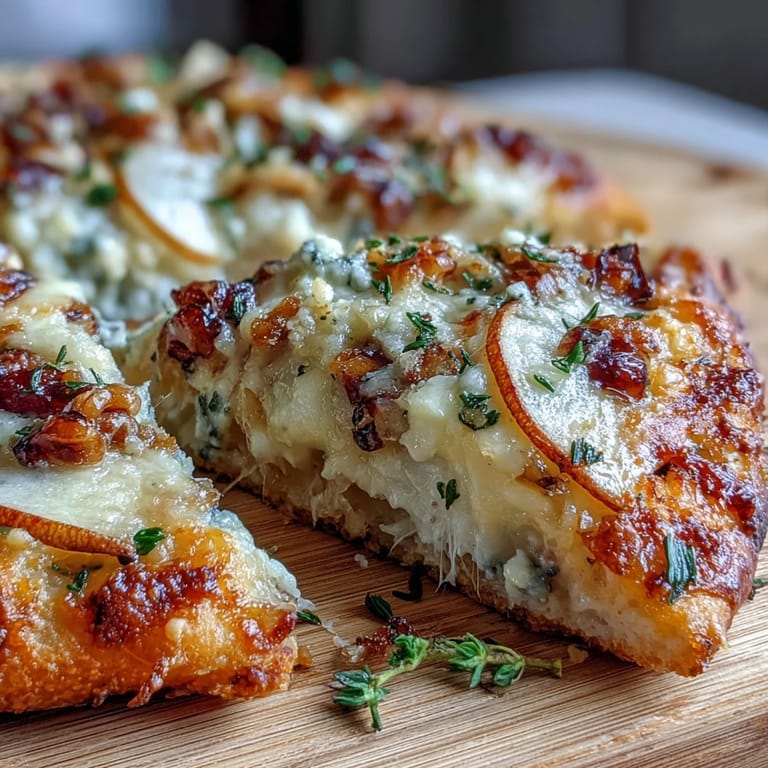
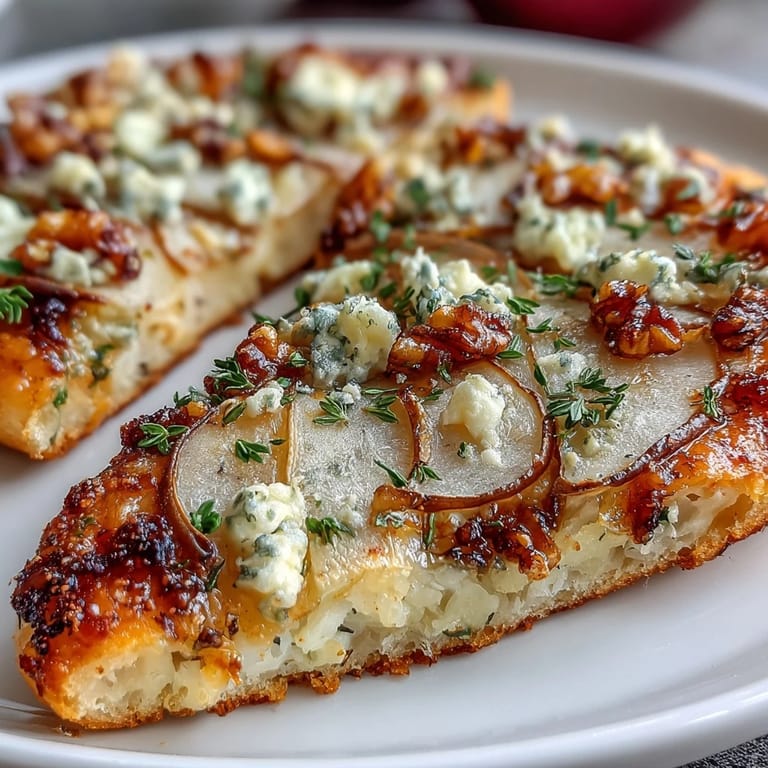
Save A friend once brought pickled walnuts to a dinner party, and I had no idea what to do with them until I spotted a ripe pear on the counter. The idea hit me all at once: something small, crisp, and balanced between sweet, tangy, and creamy. I rolled out some dough I had in the fridge, cut it into rounds, and assembled these little pizzettes in under half an hour. They vanished before the main course even made it to the table, and I've been making them ever since.
I made these for a book club gathering once, thinking they'd just be a small bite before we dove into discussion. Instead, everyone kept reaching for more, and we spent the first twenty minutes talking about the pickled walnuts and where to find them. It turned into one of those nights where the food steals the show, and I didn't mind one bit.
Ingredients
- Pizza dough: Store bought works beautifully here and saves time, but if you have homemade dough resting in the fridge, even better for flavor and texture.
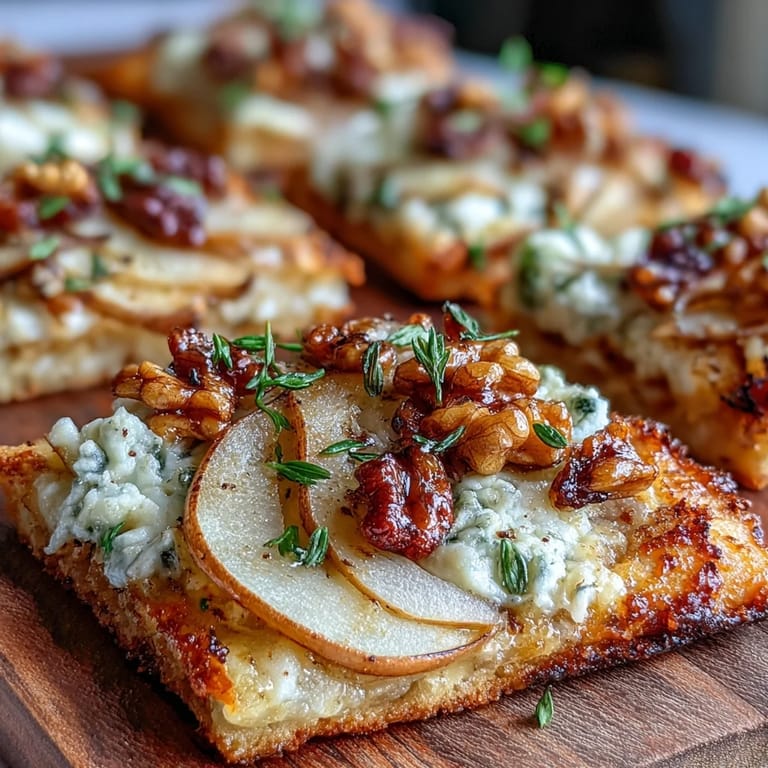
- Ripe pear: Look for one that's firm enough to slice thinly but yields slightly to pressure, it should be sweet without being mushy.
- Gorgonzola cheese: This creamy, tangy blue cheese melts into pockets of richness, use the dolce variety if you prefer something milder.
- Pickled walnuts: These add a sharp, vinegary bite that balances the sweetness of the pear, if you can't find them, regular walnuts with a drizzle of balsamic work in a pinch.
- Olive oil: A light brushing on the dough keeps it from drying out and adds a subtle fruity note.
- Fresh thyme: Just a few leaves bring an earthy, herbal touch that ties everything together without overwhelming the delicate flavors.
- Honey: A final drizzle is optional but highly recommended, it amplifies the sweetness and adds a glossy finish.
- Fresh arugula: A handful of peppery greens on top adds color and a crisp contrast to the warm, melted cheese.
Tired of Takeout? 🥡
Get 10 meals you can make faster than delivery arrives. Seriously.
One email. No spam. Unsubscribe anytime.
Instructions
- Prep the oven and tray:
- Set your oven to 220 degrees Celsius and line a baking tray with parchment paper so the pizzettes don't stick. This high heat is key to getting that crisp, golden edge.
- Cut the dough:
- Roll the dough out to about half a centimeter thick, then use a round cutter to punch out twelve circles. If the dough springs back, let it rest for a few minutes before cutting.
- Brush with oil:
- Lightly brush each round with olive oil, this prevents drying and adds flavor. Don't skip this step, it makes a noticeable difference in texture.
- Assemble the toppings:
- Layer thin pear slices on each round, then scatter crumbled Gorgonzola and sliced pickled walnuts over the top. Finish with a sprinkle of thyme leaves and a few grinds of black pepper.
- Bake until golden:
- Slide the tray into the oven and bake for twelve to fifteen minutes, watching for bubbling cheese and crisp, golden edges. The smell will tell you when they're ready.
- Finish and serve:
- Pull them out, drizzle with honey if you like, and top with fresh arugula. Serve them warm while the cheese is still gooey and the crust is at its crispest.
 Save
Save There's something about pulling a tray of these out of the oven and watching people's faces light up that never gets old. They're small enough to feel like a treat, but substantial enough that you remember each bite. I've served them at casual Friday nights and fancier gatherings, and they fit right in every time.
Choosing Your Cheese
Gorgonzola is classic here, but I've swapped it for Stilton when I wanted something a bit more robust, and Roquefort when I was feeling indulgent. Each blue cheese brings its own personality, so pick one that matches your mood or what you have on hand. The key is that creamy, tangy punch that plays off the sweetness of the pear.
About Pickled Walnuts
If you've never tried pickled walnuts, they're worth seeking out, they have this deep, briny complexity that regular walnuts just don't offer. I found mine at a specialty shop, but you can also order them online. When I can't get them, I toast regular walnuts and toss them with a splash of balsamic vinegar, it's not the same, but it gets you close enough.
Serving and Pairing
These pizzettes are best served warm, straight from the oven, when the cheese is still soft and the edges are crisp. I like to arrange them on a wooden board with a small dish of extra honey on the side for drizzling. They pair beautifully with a crisp Italian white wine, something like a Vermentino or a Soave, which balances the richness without overwhelming the delicate flavors.
- Make the dough circles ahead and refrigerate them on the tray until you're ready to top and bake.
- If you're serving a crowd, double the batch and use two trays, they go fast.
- Leftover pizzettes can be reheated in a hot oven for a few minutes, though they're never quite as good as fresh.
 Save
Save Once you've made these a few times, you'll start playing with the toppings and finding your own favorite combinations. They're forgiving, flexible, and always impressive, which is exactly what you want from an appetizer.
Recipe FAQs
- → Can I use a different cheese instead of Gorgonzola?
Yes, blue Stilton or Roquefort work beautifully as alternatives, offering similar creamy texture and bold flavor profiles that complement the sweet pears perfectly.
- → What can I substitute for pickled walnuts?
Regular walnuts with a splash of balsamic glaze make an excellent substitute, providing the nutty crunch while the balsamic adds the tangy complexity of pickled versions.
- → How do I prevent the pizzettes from becoming soggy?
Ensure your oven is fully preheated to 220°C, roll the dough thin, and avoid overloading with toppings. The high heat creates a crisp base while keeping toppings perfectly cooked.
- → Can these be made ahead of time?
You can prepare the dough rounds and slice ingredients ahead, but bake just before serving for the best crispy texture. They're best enjoyed warm from the oven.
- → What wine pairs well with these pizzettes?
A crisp Italian white wine like Pinot Grigio or Verdicchio complements the creamy Gorgonzola and sweet pears beautifully, balancing the rich flavors with refreshing acidity.
- → How thin should I slice the pears?
Slice pears about 2-3mm thick so they soften slightly during baking without becoming mushy, maintaining their delicate texture while allowing the flavors to meld beautifully.